Oct 02 2010

just a blog hop

Welcome to Just A Blog Hop!

If you came here from Denise Marzec’s blog then you’re on the right track. If not, then you’ll want to head over to Jami Sibley’s blog to start the hop from the beginning. Next stop on the hop is Deborah Robb!

We were invited to put aside all of our stamping oriented obligations and deadlines and create something just for fun. The hop guidelines were simple: choose a challenge to play and choose either a new uninked stamp or an old favorite. Create a card and mail it to someone. What could be better to celebrate World Card making day? I decided to play one of the Splitcoststampers Sketch Challenges from the past few weeks: Sketch Challenge 298!

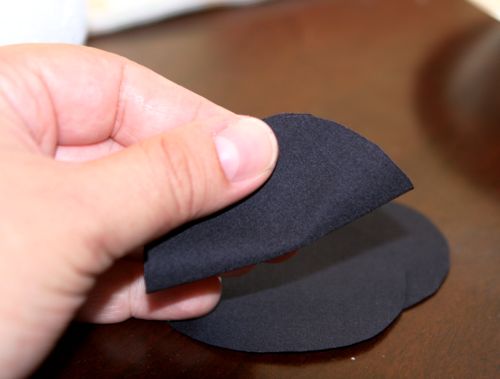
I love to do sketch challenges because it helps take a big load off when you just want to enjoy using some new (or old!) stamps! A lot of times the sketches help me decide which stamps to use for a project. I knew I wanted to do a Halloween card and loved the fun and simple layering to this layout. I used one of my PaperTrey Ink stamp sets, I just love the charming simplicity of the lines in their images! This spider was yet to be inked, so he was perfect for today!

I do hope you forgive me for the poorly cut out spider! I had high hopes to have my craft room put together so that I could stamp in an organized room, but as it happened I got sick this week and spent some time napping instead of organizing (it was kinda nice to have a good reason for a nap. LOL!). I also have yet to find my box of SU! ink pads, scissors, stamp cleaner, and sewing machine foot peddle, among other lost treasures that I am desperately hoping are in my garage! However, if you saw the scissors I used to cut out those little legs you’d believe in Santa Claus.

As a special treat for Just A Blog Hop, I’m offering a “Treats Only” give away! Just leave a comment and on Monday I’ll announce the winner! You’ll receive this card along with a box of stamping goodies, including at least one stamp set! This is coming from my stash that I just don’t use and it’s making me sad to see it neglected.

I hope you enjoy Just A Blog Hop and find some inspiration to celebrate World Card Making Day!

Your next stop is Deborah Robb! πŸ˜€

21 responses so far

Oct 01 2010

cupcakes and rainbows

Published by under cupcakes,just stuff

We had more fun weather yesterday. There was wind, some rain and this fabulous double rainbow!

It was also the first time I baked cupcakes in my kitchen! Oh, the beauty of double ovens!

And oh, the beauty of chocolate buttermilk cupcakes with chocolate buttercream frosting!

Happy Friday!

3 responses so far

Sep 27 2010

ruff

Published by under Sam

Sometimes Mondays are ruff.

2 responses so far

Sep 20 2010

no place like mantis

Published by under Family

mantisss.jpg

As long as we can find a praying mantis in the yard we know we’re home. It certainly makes Mr. O happy.

I wonder if the mantises appreciate him taking time to play with them and take them for rides around the neighborhood.

mantissssss.jpg

I guess we’ll never know!

No responses yet

Sep 16 2010

brains!

Published by under crochet

brainhato.jpg

Right now my favorite thing to get in the mail is my Crochet Today! magazine! I love to spend my time going thru it, looking over each pattern and deciding which to do first.

When I got the Sept/Oct issue I stopped in my tracks when I came across the Brainy Maniac! (ravelry link)

I immediately went out and bought the yarn to make it for Mr. O.

Let me tell you, I watched a lot of Friends while I crocheted those brains and finally I completed it this morning!

Owen’s been wearing it since he got home, even to his piano lessons! He says it helps him think bigger thoughts!

3 responses so far

Sep 05 2010

avast! or whatever it is vikings say

Published by under crochet

viking1.jpg

Went to a birthday party for a cute little boy yesterday and this was his gift!

We’ve been on a reading frenzy around here, finishing off all the Wimpy Kid books last month and beginning the How to Train your Dragon series. We are currently almost done with book two, How to be a Pirate.

So when I was thinking of a fun gift for a little boy who’s turning two and likes to pretend I remembered seeing the book Hiccup: The Viking who was seasick, about the main character from How to train your Dragon when he was just a wee viking. It’s an out of print book, but I lucked out and got a copy from an Amazon vendor and it arrived 14 days earlier than scheduled, thank goodness! Naturally, there needed to be a viking helmet to go with the book.

I used this awesome pattern from ravelry: Stripe and Solid Viking Helmet

I plan to get a lot of use out of this pattern. The boys want to be Hiccup and Fishlegs for Halloween, complete with crocheted helmets and dragons to sit on their shoulders. Today I start on one of six planned helmets.

I think I might be crazy.

2 responses so far

Aug 26 2010

august rain

Published by under Family

augustrain.jpg

We had a bit of an exciting day yesterday. When I left to pick up the boys from school it was sweltering at 107 with a heat that just sat on your shoulders. By the time I got them from school and we were back to the van it had gone up to 110 with a sky full of dark clouds. It was definitely weather for a thunder storm.

I thought some Cherry Icee Floats were in order, so we headed to get some and that’s when the lightening began.

By the time we headed home, it was 111 when we entered the freeway. Soon it started raining and in about five minutes the weather dropped from 111 to 81 with giants drops of warm rain and wind. You can see how the tree across the street is bending over. It went crazier than that!

The big surprise was that our power was out. The rain storm lasted for quite a while and I was pretty soaked from running back and forth to my sister-in-law’s, because what else is there to do in a rain storm with no electricity? Haha! We were some of the lucky ones to only have our power out for a little over three hours. It was a welcomed relief to turn the air conditioning back on as the humidity outside was so thick you could cut it with a knife.

It was so bizarre, but I was excited about the lighting and took advantage of it!

oorigamirain.jpg

O and his origami, the newest pass time.

paugustrain.jpg

P and his dimple!

poaugustrain.jpg

I love this one. Reminds me of the first house we lived in as kids. My brother and I would watch the rain go down the street as it made a “chocolate river”.

Only my boys are looking at the street.

They are looking at the “chocolate swamp” known as the backyard …

One response so far

Aug 25 2010

that’s a wrap

Published by under crochet

applewrap.jpg

Finished this cute apple cozy today! The pattern can be found at ravelry here: apple cozy

Next time I make one, I’m going to make the straps longer. I had a little bit of a hard time tying it but this one is still useable.

Fun, quick project!

One response so far

Aug 18 2010

fabric pom-poms

Published by under crafty stuff

pompom1.jpg

With moving into a new Ward, I have a new calling – YW Secretary! It’s a lot of fun for me especially when I get to help plan crafting projects! πŸ˜‰

This week we made fabric pom-poms. The original idea came from here: Fabric Pom-Poms

Here is how we did ours:

We searched high and low for paper lanterns but could only find the huge ones (9″ diameter and up), so we went with 3″ styrofoam balls. You can find them at your local craft supply in packs of 6 (they run about $5.00 over here) and use your coupons!

Next you’ll need some fabric. We used the $2.99/yard broadcloth from our local JoAnns. Each ball takes a folded width of 11 1/2″ wide. You can easily get two pom-poms from 1/2 yard of fabric.

pompom2.jpg

The first thing you’ll want to do is cut out your circles. For the 3″ ball, we used 2 1/2″ circles. I had a glass that was the right size so we used it to make a template out of a cereal box. You’ll want to trace them with a pencil onto your fabric rather closely. From the 11 1/2″ piece you can get four circles across by eight circles down, giving you a total of 64 circles. Keep your fabric folded in half so you’re cutting two circles at a time.

Once they are all cut, the fun starts!

pompom3.jpg

Using a single layer of fabric, fold your circle in half making a “taco”.

pompom4.jpg

Fold that in half again.

pompom5.jpg

To keep the shape, add a dab of hot glue a little bit away from the tip.

pompom6.jpg

Then squeeze it closed.

pompom7.jpg

Continue until you have 64 completed “petals”! Don’t they look fun all together?Now it’s time to grab your styrofoam ball and start adding the petals!

pompom8.jpg

Put your pointer finger and your thumb into the opening of the petal and add a nice dollop of hot glue to the tip.

pompom10.jpg

Squash it gently onto the styrofoam ball. The hot glue will melt the styrofoam a little bit, this is great for helping you to shape the petals as you put them on the form.

pompom11.jpg

Hooray! You have one done!

pompom13.jpg

Continue, making sure to place them every which way as you glue them on. You don’t want any type of pattern, just wonderful randomness! haha

pompom14.jpg

Soon you’ll have this!

pompom15.jpg

When you’re pom-pom is almost covered, cut about a 44″ piece of ribbon. Put a line of hot glue on the styrofoam ball and lay the ribbon over it, pulling down on the ribbon until it is stuck in the hot glue.

pompom1.jpg

Finish glueing on your petals until it’s completed! Tie the ribbon in a bow at the top and you’re done!I’m excited to add embellishments to these and do them in holiday colors! I’ll share a completed embellished version once I’m done!

Materials:

3″ styrofoam ball
low temp hot glue gun and sticks
11 1/4″ cut of fabric
ribbon
2 1/2″ circle template

Tips:

You want to use a minimum of 64 circles. You can go up to 78 for a fuller look, any more than that might be overkill.
Don’t want to use scissors to cut your circles? Try using a die cut system with your fabric!

2 responses so far

Aug 17 2010

new year, new door

Published by under Family

b2s2010w.jpg

We started school last Wednesday. I now have a Third Grader and a Fifth Grader! I’m not sure if I’m ready for that to sink in.

With our move, the boys are in a new school district which means a new school. It’s a little unsettling to send them to a new place after the previous school they attended. We’re really going to miss that one. πŸ™ For now we just have to stick it out and see how this one goes. I’ve come to the realization that we were a little spoiled with our last school.

I didn’t get as many pictures as I usually do of their first day of school because parents weren’t allowed to visit the room. At our previous school we were allowed to line up with them, walk to their room, get a picture at their desk, then we’d wave and leave. I can understand not allowing this, it just would have set me at ease to shake their teacher’s hand and get a look at their school. So I came home and occupied myself with mindless activity until it was time to pick them up.

I will tell you one good thing about this new school – it doesn’t start until 9 AM! This means Mr. O will get decent sleep since he’s the one who takes longer, sometimes MUCH longer, to fall asleep each night. I also don’t mind waking up at 7 instead of 6:15. πŸ˜‰

b2s2010.jpg

So begins our first year of photos in front of the new door. That peep hole looks so high, but I know that before I’m ready for it they will be able to use it.

One response so far

« Newer Entries - Older Entries »